
A Calibration Management Specialist's Guide to Laboratory Balance Calibration.
1. Introduction.
The calibration and verification of laboratory balances requires you to carry out four procedures, each of which is designed to evaluate the accuracy of a particular characteristic of the instrument. These are:
| Linearity | |
| Repeatability | |
| Hysteresis | |
| Pan position error (PPE) |
Under normal circumstances it takes a lot of work to complete the procedures. Firstly the weights have to be addded and removed, readings must taken and recorded. Then, finally, the apprropraiate calculations need to be performed and calibration certificates generated.
Using Calibration Toolbox ADO's "Balance" calibration data type, much if the work involved in recording the data and performing the calculations is done for you. Additionally, generation of calibration certificates becomes a simple and error-free process, all of which help you comply with the demands of GLP and ISO 17025.
2. Laboratory Balance Interface.
Fundamental to our support for balance calibration is Calibration Toolbox ADO's laboratory balance interface.
This enables you to connect your balance to the software using either RS-232 or USB - whichever your balance has. The following balances are supported:
- Mettler Toledo
- Ohaus
- A and D
- Sartorious
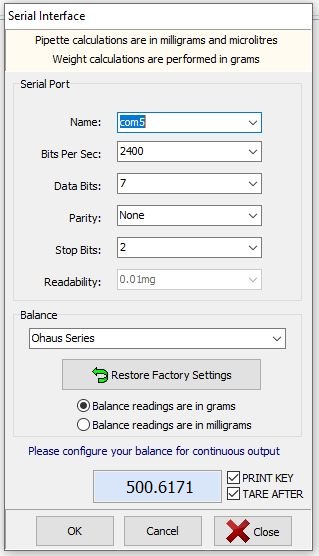
The balance interface is simplicity itself, and all of your settings will be remembered. Simply select:
- The type of balance
- The serial port and communication settings
- Balance output units (g or mg)
- The balance's readability (if available)
Then, looking near to the bottom of the window, ensure that the following two boxes are checked:
- PRINT KEY
- TARE AFTER
This will enable the balance to send its latest reading to Calibration Toolbox ADO and then tare the balance to 0.0 ready for the next weight.
Then, with reference to the picture below: the user simply needs to:
- Position the mouse cursor and click the first cell for data entry
-
add the weight and press the PRINT button on the balance
This will put the reading into the cell and move the cursor to the next cell DOWN to the next position ready for the next weight - Click "Calculate" when the As Found test point is completed
- The user will then repeat items 1 to 3 above for the other As Found points and then the As Left if necessary
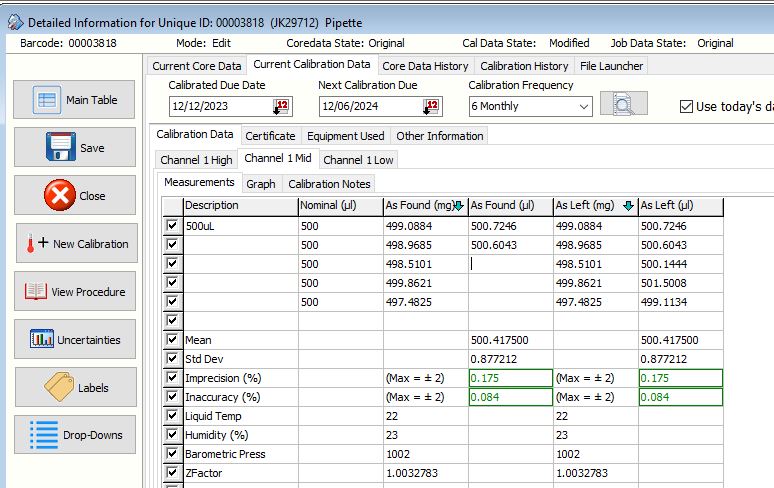
As you see, the need for writing down readings and then transferring them at a later date has been eliminated.
All the calculations are performed in accordance with internationally accepted guidelines.
We'll now look at each of these procedures and the way in which Calibration Toolbox ADO handles them.
3. Balance Repeatability.
The repeatability of a balance is measured by calculating the standard deviation of a number of readings (Toolbox allows a maximum 20) of the same standard weight.
The value of the weight should be somewhere approximately equal to the full-scale of the balance (or the maximum weight at which it will be used). By "repeat readings" we mean that the weight is placed in the centre of the pan and then removed. This is repeated for the requisite number of calibration points.
The figure below shown how the Repeatability part of the calibration data template (in other words,test plan or procedure) is designed.
Note that the weight to be used is entered only once.
The number of calibration points is selected from a drop-down list.
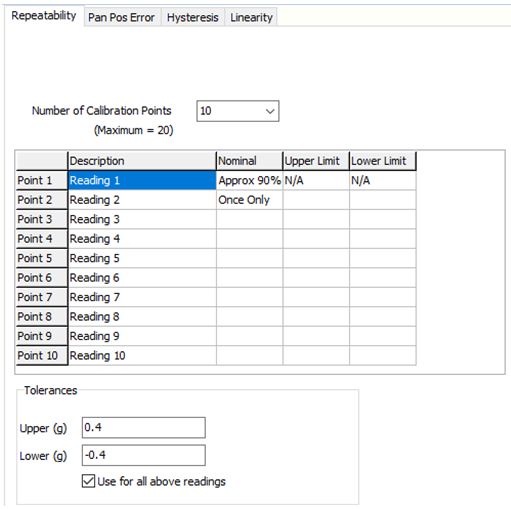
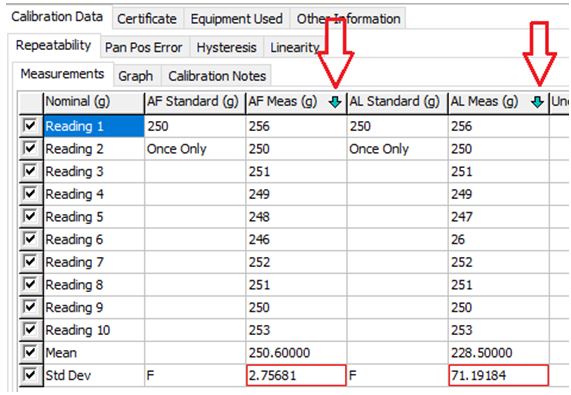
The picture below shows how the measurements are recorded in calibration Toolbox ADO.
Just to repeat: the Calibration Toolbox ADO Balance Interface does the job of recording the balance readings for you. All you need to do is position the mouse cursor and click the first cell for data entry
(either As Found or As Left) and then add the first weight and press the PRINT button on the balance.
This will put the reading into the cell and move the cursor to the next cell DOWN to the next position ready for the next weight.
4. Balance Linearity.
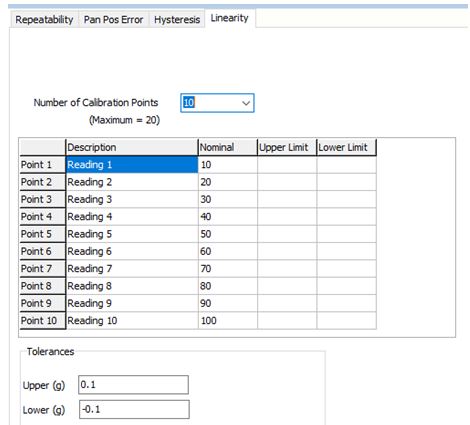
Balance linearity is, what we might consider to be, the most typical calibration test of our set of for balance calibration parts. Namely: add a series of standard weights and record the balance reading for each of them and compare the differences.
A typical ten-point balance linearity calibration template is shown below:
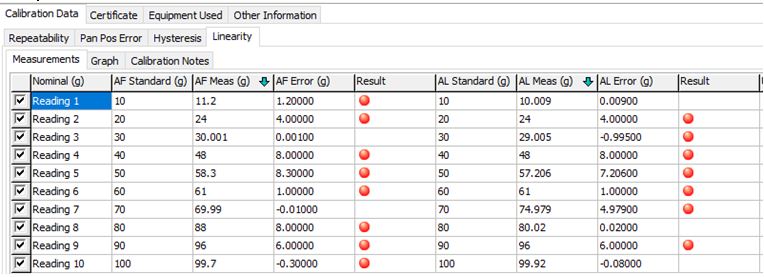
A typical set of results is shown below.
Note that the error values have been calculated for you, together with the pass fail results - based on the limits you specified in your calibration data template.
5. Balance Hysteresis.
Hysteresis is a term that is used to describe differences in measurements of a value when it is increasing and the same measurements decreasing. An example of this would be adding weights to a pan and then removing them.
For this procedure Calibration Toolbox ADO uses an internationally accepted procedure as follows:
| (i) Empty pan and tare | Pz1 | |
| (ii) Add first weight and record | Ph1 | |
| (iii) Add second weight | ||
| (iv) Wait 15-30sec | ||
| (v) Remove second weight | ||
| (vi) Record first weight left in pan | Ph2 | |
| (vii) Remove first weight and record empty value | Pz2 |
Thew value of hysteresis is calculated as follows:

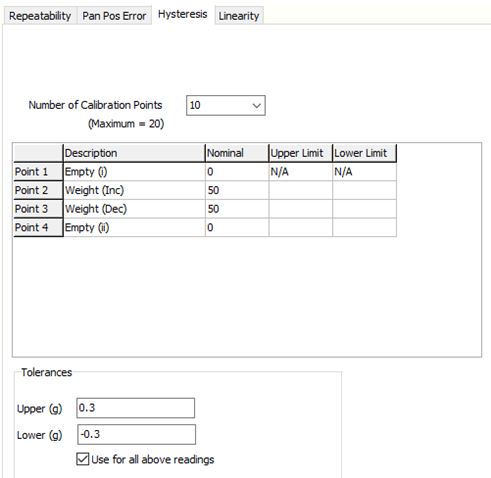
The picture below gives an example of how this is entered in a calibration data template. As in other tests, it is assumed that the same weights will be used for the As Found and As Left tests.
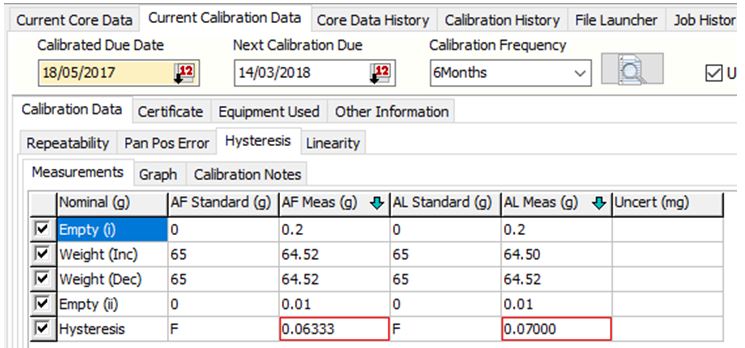
The picture below shows the measurements and calculations for a typical hysteresis analysis.
6. Balance Pan Position Error (PPE).
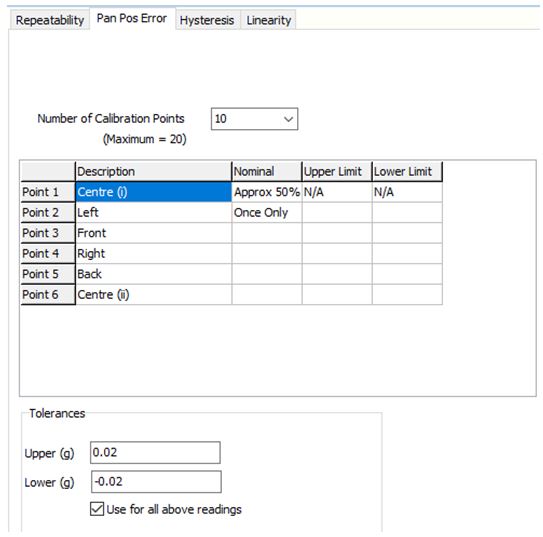
The Pan Position Error (PPE) test is an assessment of how the reading of a particular weight is affected by where the weight is placed on the balance pan. Six readings of the same weight are recorded as shown below:
| 1. Centre (i) | |
| 2. Left | |
| 3. Front | |
| 4. Right | |
| 5. Back | |
| 6. Centre (ii) |
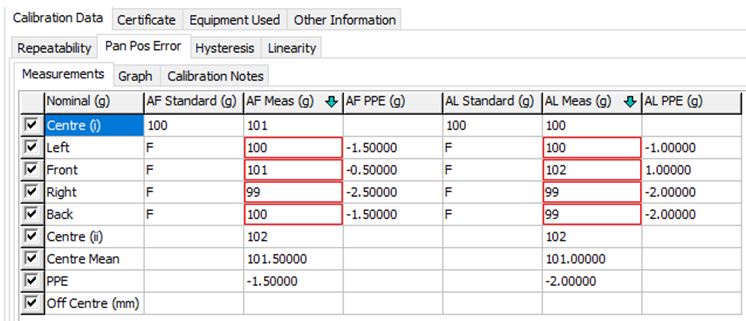
The average of the two centre readings is calculated and this is subtracted from each of the off-centre readings. The maximum error value of these differences (ignoring the sign) is selected to be the quoted PPE value
The picture blow shows a typical PPE calibration data template. Note that the test weight is chosen to approximately 50% of the balance's full scale value.
The picture below shows the measurements and calculations for a typical PPE analysis.
Remember, once again, that the balance reading will be transferred directly in to Calibration Toolbox ADO as soon as the PRINT button is pressed.
7. Useful Links.
Here are some links that you might find useful. Some refer to standards which were used in the development of the Balance Calibration Module.
MSL New Zealand: Technical Guide 25 - A method for calibrating balances
